在 Azure ML 管道中运行流#
作者: 

为什么使用 Azure 机器学习 (ML) 管道在云端运行流?#
在实际场景中,流服务于各种目的。例如,考虑一个旨在评估人机交互会话相关性分数的流。假设您希望每晚触发此流以评估今天的性能,并避免 LLM(语言模型)终结点的高峰时段。在这种常见场景中,人们通常会遇到以下需求:
处理大型数据输入:一次运行数千或数百万数据输入的流。
可伸缩性和效率:需要一个可伸缩、高效且具有弹性的平台来确保成功。
自动化:当上游数据就绪或以固定间隔自动触发批处理流。
Azure ML 管道有效地解决了所有这些离线需求。通过提示流和 Azure ML 管道的集成,流用户可以非常轻松地实现上述目标,在本教程中,您将学习:
如何使用 Python SDK 自动将流转换为 Azure ML 管道中的“步骤”。
如何将数据输入管道以触发批处理流运行。
如何在提示流步骤之前或之后构建其他管道步骤。例如数据预处理或结果聚合。
如何设置一个简单的管道调度程序。
如何将管道部署到 Azure ML 批处理终结点。然后,我可以在需要时使用新数据调用它。
在开始之前,请考虑以下先决条件:
Azure ML 平台简介
了解什么是Azure ML 管道和组件。
Azure 云设置
一个拥有活动订阅的 Azure 帐户 - 免费创建帐户
从 Azure 门户创建 Azure ML 资源 - 创建 Azure ML 工作区
连接到您的工作区,然后设置一个基本计算群集 - 配置工作区
本地环境设置
一个 Python 环境
安装 Azure Machine Learning Python SDK v2 - 安装说明 - 检查入门部分,并确保 'azure-ai-ml' 的版本高于
1.12.0
1. 连接到 Azure 机器学习工作区#
工作区是 Azure 机器学习的顶级资源,提供了一个集中位置来处理您在使用 Azure 机器学习时创建的所有工件。本节我们将连接到将运行作业的工作区。
1.1 导入所需的库#
# import required libraries
from azure.identity import DefaultAzureCredential, InteractiveBrowserCredential
from azure.ai.ml import MLClient, load_component, Input, Output
from azure.ai.ml.constants import AssetTypes
from azure.ai.ml.dsl import pipeline
1.2 配置凭据#
我们使用 DefaultAzureCredential 来获取对工作区的访问权限。DefaultAzureCredential 应该能够处理大多数 Azure SDK 身份验证场景。
如果它对您不起作用,请参考更多可用的凭据:配置凭据示例、azure-identity 参考文档。
try:
    credential = DefaultAzureCredential()
    # Check if given credential can get token successfully.
    credential.get_token("https://management.azure.com/.default")
except Exception as ex:
    # Fall back to InteractiveBrowserCredential in case DefaultAzureCredential not work
    credential = InteractiveBrowserCredential()
1.3 获取工作区的句柄#
我们使用“配置文件”连接到您的工作区。请检查此笔记本以从 Azure ML 工作区门户获取您的配置文件并将其粘贴到此文件夹中。然后,如果您通过下一个代码块,则表示您已为环境做好所有准备。
# Get a handle to workspace
ml_client = MLClient.from_config(credential=credential)

# Retrieve an already attached Azure Machine Learning Compute.
cluster_name = "cpu-cluster"
print(ml_client.compute.get(cluster_name))
2. 将流作为组件加载#
如果您已经使用 Promptflow SDK 或门户创作了一个流,您可以在流文件夹中找到 flow.dag.yaml 文件。此 YAML 规范对于将流加载到 Azure ML 组件中至关重要。
备注:要将
load_component函数与 flow.dag.yaml 一起使用,请确保以下各项:
$schema应在目标 DAG yaml 文件中定义。例如:$schema: https://azuremlschemas.azureedge.net/promptflow/latest/Flow.schema.json。必须通过验证文件“
/.promptflow/flow.tools.json”来生成并保持流元数据最新。如果它不存在,运行以下命令来生成和更新它: pf flow validate --source <my-flow-directory>。
flow_component = load_component("../../flows/standard/web-classification/flow.dag.yaml")
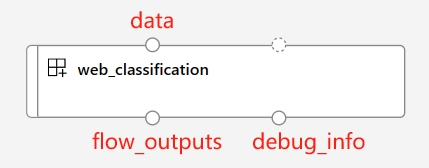
当使用load_component函数和流 YAML 规范时,您的流会自动转换为并行组件。此并行组件专为大规模、离线、并行化处理而设计,具有效率和弹性。以下是此自动转换组件的一些关键特性:
预定义的输入和输出端口
端口名称 |
类型 |
描述 |
|---|---|---|
数据 |
uri_folder 或 uri_file |
接受批处理数据输入到您的流中。如果您的数据是单个文件,您可以使用 |
flow_outputs |
uri_file |
生成一个名为 parallel_run_step.jsonl 的单个输出文件。此数据文件中的每一行对应一个 JSON 对象,表示流返回,以及一个名为 line_number 的附加列,指示其在原始文件中的位置。 |
debug_info |
uri_folder |
如果您在调试模式下运行流组件,此端口将为您的每一行运行提供调试信息。例如,步骤之间的中间输出,或 LLM 响应和令牌使用情况。 |
注意
当您使用多个节点运行 pf 组件时,
flow_outputs和debug_info输出需要将输出模式设置为mount模式。
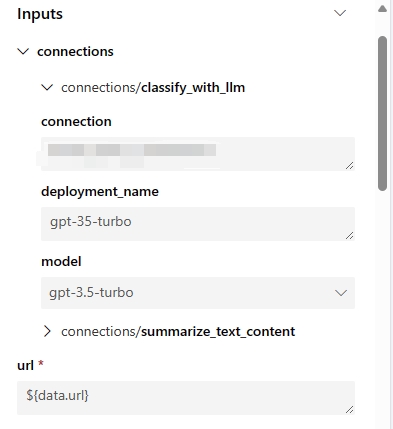
自动生成的参数
这些参数表示所有流输入以及与流步骤关联的连接。您可以在流/运行定义中设置默认值,并且可以在作业提交期间进一步自定义它们。以 'web-classification' 示例流为例,此流只有一个名为 'url' 的输入和 2 个 LLM 步骤 'summarize_text_content' 和 'classify_with_llm'。此流组件的输入参数为:
自动生成的环境
创建的组件的环境将继承自最新的提示流运行时镜像。用户可以通过在
flow.dag.yaml中指定environment属性,以及位于同一流文件夹下的 'requirements.txt' 文件,在环境中包含自定义包。... environment: python_requirements_txt: requirements.txt
3. 构建管道#
3.1 声明输入和输出#
要为您的管道提供数据,您需要使用path、type和mode属性声明一个输入。请注意:mount是文件或文件夹数据输入的默认且建议模式。
声明管道输出是可选的。但是,如果您需要云中自定义的输出路径,您可以按照下面的示例设置数据存储上的路径。有关有效路径值的更多详细信息,请参阅此文档 - 管理管道输入输出。
data_input = Input(
    path="../../flows/standard/web-classification/data.jsonl",
    type=AssetTypes.URI_FILE,
    mode="mount",
)

pipeline_output = Output(
    # Provide custom flow output file path if needed
    # path="azureml://datastores/<data_store_name>/paths/<path>",
    type=AssetTypes.URI_FOLDER,
    # rw_mount is suggested for flow output
    mode="rw_mount",
)
3.2.1 使用单个流组件运行管道#
由于所有 Promptflow 组件都基于 Azure ML 并行组件,因此用户可以利用特定的运行设置来控制流运行的并行化。以下是一些有用的设置:
运行设置 |
描述 |
允许值 |
默认值 |
|---|---|---|---|
PF_INPUT_FORMAT |
当使用 |
json, jsonl, csv, tsv |
jsonl |
计算 |
定义将用于此作业的 Azure ML 工作区中的计算群集。 |
||
instance_count |
定义将分配给此作业的计算群集中的节点数。 |
从 1 到计算群集的节点数。 |
1 |
max_concurrency_per_instance |
定义在 1 个节点上并行运行流的专用处理器数量。当与 'instance_count' 设置结合使用时,您的流的总并行化将是 instance_count*max_concurrency_per_instance。 |
>1 |
1 |
mini_batch_size |
定义每个 mini-batch 的行数。mini-batch是使用并行化处理完整数据的基本粒度。每个工作处理器一次处理一个 mini-batch,并且所有工作进程在不同节点上并行工作。 |
> 0 |
1 |
max_retries |
定义如果任何 mini-batch 遇到内部异常时的重试次数。 |
>= 0 |
3 |
error_threshold |
定义可接受的失败行数。如果失败行数超过此阈值,作业将停止并标记为失败。设置为 '-1' 以禁用此失败检查。 |
-1 或 >=0 |
-1 |
mini_batch_error_threshold |
定义所有重试后可容忍的最大失败 mini-batch 数。设置为 '-1' 以禁用此失败检查。 |
-1 或 >=0 |
-1 |
logging_level |
确定并行作业如何将日志保存到磁盘。将流组件设置为 'DEBUG' 允许组件将中间流日志输出到 'debug_info' 端口。 |
信息、警告、调试 |
信息 |
超时 |
设置每个 mini-batch 执行的超时检查器(以毫秒为单位)。如果 mini-batch 运行时间超过此阈值,它将被标记为失败并触发下一次重试。请根据您的 mini-batch 大小和 LLM 终结点的总流量吞吐量考虑设置更高的值。 |
> 0 |
600 |
# Define the pipeline as a function
@pipeline()
def pipeline_func_with_flow(
    # Function inputs will be treated as pipeline input data or parameters.
    # Pipeline input could be linked to step inputs to pass data between steps.
    # Users are not required to define pipeline inputs.
    # With pipeline inputs, user can provide the different data or values when they trigger different pipeline runs.
    pipeline_input_data: Input,
    parallel_node_count: int = 1,
):
    # Declare pipeline step 'flow_node' by using flow component
    flow_node = flow_component(
        # Bind the pipeline intput data to the port 'data' of the flow component
        # If you don't have pipeline input, you can directly pass the 'data_input' object to the 'data'
        # But with this approach, you can't provide different data when you trigger different pipeline runs.
        # data=data_input,
        data=pipeline_input_data,
        # Declare which column of input data should be mapped to flow input
        # the value pattern follows ${data.<column_name_from_data_input>}
        url="${data.url}",
        # Provide the connection values of the flow component
        # The value of connection and deployment_name should align with your workspace connection settings.
        connections={
            "summarize_text_content": {
                "connection": "azure_open_ai_connection",
                "deployment_name": "gpt-35-turbo",
            },
            "classify_with_llm": {
                "connection": "azure_open_ai_connection",
                "deployment_name": "gpt-35-turbo",
            },
        },
    )

    # Provide run settings of your flow component
    # Only 'compute' is required and other setting will keep default value if not provided.
    flow_node.environment_variables = {
        "PF_INPUT_FORMAT": "jsonl",
    }
    flow_node.compute = "cpu-cluster"
    flow_node.resources = {"instance_count": parallel_node_count}
    flow_node.mini_batch_size = 5
    flow_node.max_concurrency_per_instance = 2
    flow_node.retry_settings = {
        "max_retries": 1,
        "timeout": 1200,
    }
    flow_node.error_threshold = -1
    flow_node.mini_batch_error_threshold = -1
    flow_node.logging_level = "DEBUG"

    # Function return will be treated as pipeline output. This is not required.
    return {"flow_result_folder": flow_node.outputs.flow_outputs}


# create pipeline instance
pipeline_job_def = pipeline_func_with_flow(pipeline_input_data=data_input)
pipeline_job_def.outputs.flow_result_folder = pipeline_output
将管道作业提交到您的工作区,然后通过输出中的链接在 UI 上检查作业状态。
# Submit the pipeline job to your workspace
pipeline_job_run = ml_client.jobs.create_or_update(
    pipeline_job_def, experiment_name="Single_flow_component_pipeline_job"
)
pipeline_job_run

ml_client.jobs.stream(pipeline_job_run.name)
注意
mini_batch_size的选择会显著影响流作业的效率。由于每个 mini-batch 中的行按顺序运行,为该参数设置更高的值会增加块大小,从而降低并行化。另一方面,较大的批处理大小也会增加重试成本,因为重试是基于整个 mini-batch。相反,选择最低值(例如 mini_batch_size=1)可能会引入额外的开销,影响编排或结果汇总期间多个 mini-batch 的效率。因此,建议从 10 到 100 之间的值开始,然后根据您的具体要求进行微调。
max_concurrency_per_instance设置可以显著提高单个计算节点内的并行效率。但是,它也引入了几个潜在问题:1) 增加内存不足的风险,2) LLM 终结点在同时接收过多请求时可能会遇到限制。通常,建议将 max_concurrency_per_instance 数设置为等于计算核心数,以在并行性和资源限制之间取得平衡。
3.2.2 运行具有多个组件的复杂管道#
在典型的管道中,您会发现包含所有离线业务需求的多个步骤。如果您打算构建一个更复杂的生产管道,请探索以下资源:
各种组件类型
此外,请考虑以下示例代码,该代码从存储库加载两个额外的命令组件以构建单个离线管道:
data_prep_component:此虚拟数据预处理步骤执行简单的数据采样。
result_parser_component:结合源数据、流结果和调试输出,它生成一个包含原始查询、LLM 预测和 LLM 令牌使用情况的单个文件。
# load Azure ML components
data_prep_component = load_component("./components/data-prep/data-prep.yaml")
result_parser_component = load_component(
    "./components/result-parser/result-parser.yaml"
)

# load flow as component
flow_component = load_component("../../flows/standard/web-classification/flow.dag.yaml")


@pipeline()
def pipeline_func_with_flow(pipeline_input_data):
    data_prep_node = data_prep_component(
        input_data_file=pipeline_input_data,
    )
    data_prep_node.compute = "cpu-cluster"

    flow_node = flow_component(
        # Feed the output of data_prep_node to the flow component
        data=data_prep_node.outputs.output_data_folder,
        url="${data.url}",
        connections={
            "summarize_text_content": {
                "connection": "azure_open_ai_connection",
                "deployment_name": "gpt-35-turbo",
            },
            "classify_with_llm": {
                "connection": "azure_open_ai_connection",
                "deployment_name": "gpt-35-turbo",
            },
        },
    )

    flow_node.environment_variables = {"PF_INPUT_FORMAT": "csv"}
    flow_node.compute = "cpu-cluster"
    flow_node.mini_batch_size = 5
    flow_node.max_concurrency_per_instance = 2
    flow_node.resources = {"instance_count": 1}
    flow_node.logging_level = "DEBUG"

    # set output mode to 'mount'
    # This is required for the flow component when the 'instance_count' is set higher than 1
    flow_node.outputs.flow_outputs.mode = "mount"
    flow_node.outputs.debug_info.mode = "mount"

    result_parser_node = result_parser_component(
        source_data=data_prep_node.outputs.output_data_folder,
        pf_output_data=flow_node.outputs.flow_outputs,
        pf_debug_data=flow_node.outputs.debug_info,
    )

    flow_node.retry_settings = {
        "max_retries": 1,
        "timeout": 6000,
    }

    result_parser_node.compute = "cpu-cluster"

    return {"flow_result_folder": result_parser_node.outputs.merged_data}


# create pipeline instance
pipeline_job_def = pipeline_func_with_flow(pipeline_input_data=data_input)
pipeline_job_def.outputs.flow_result_folder = pipeline_output
将管道作业提交到您的工作区,然后通过输出中的链接在 UI 上检查作业状态。
# submit job to workspace
pipeline_job_run = ml_client.jobs.create_or_update(
    pipeline_job_def, experiment_name="Complex_flow_component_pipeline_job"
)
pipeline_job_run

ml_client.jobs.stream(pipeline_job_run.name)
4 后续步骤#
4.1 后续步骤 - 为管道设置调度程序#
Azure Machine Learning 管道支持本机调度程序,帮助用户通过预定义的时间触发器定期运行其管道作业。以下是使用流组件在新创建的管道上设置调度程序的代码示例。
让我们首先声明一个具有自定义重复模式的调度程序。
from datetime import datetime
from azure.ai.ml.entities import JobSchedule, RecurrenceTrigger, RecurrencePattern
from azure.ai.ml.constants import TimeZone

schedule_name = "simple_sdk_create_schedule_recurrence"
schedule_start_time = datetime.utcnow()

recurrence_trigger = RecurrenceTrigger(
    frequency="day",  # could accept "hour", "minute", "day", "week", "month"
    interval=1,
    schedule=RecurrencePattern(hours=10, minutes=[0, 1]),
    start_time=schedule_start_time,
    time_zone=TimeZone.UTC,
)

job_schedule = JobSchedule(
    name=schedule_name,
    trigger=recurrence_trigger,
    # Declare the pipeline job to be scheduled. Here we uses the pipeline job created in previous example.
    create_job=pipeline_job_def,
)
要启动调度程序,请按照此示例操作:
job_schedule = ml_client.schedules.begin_create_or_update(
    schedule=job_schedule
).result()
print(job_schedule)
要查看所有已调度作业,请导航到 Azure Machine Learning 工作区 UI 中的作业列表页面。由调度程序触发的任何作业都将具有以下格式的显示名称:<schedule_name>-<trigger_time>。例如,如果您有一个名为“named-schedule”的调度程序,则在 2021 年 1 月 1 日 06:00:00 UTC 触发的作业将具有显示名称“named-schedule-20210101T060000Z”。
要禁用或关闭正在运行的调度程序,请按照此示例操作:
job_schedule = ml_client.schedules.begin_disable(name=schedule_name).result()
job_schedule.is_enabled
要探索有关调度 Azure Machine Learning 管道作业的更多详细信息,请访问此文章:如何调度管道作业
4.2 后续步骤 - 将管道部署到终结点#
Azure Machine Learning 还提供批处理终结点,使您能够将管道部署到终结点以实现高效的操作。如果您需要使用外部业务流程协调程序(例如 Azure Data Factory 或 Microsoft Fabric)调度流管道,那么使用批处理终结点是您流管道的最佳推荐。
让我们首先在您的工作区中创建一个新的批处理终结点。
from azure.ai.ml.entities import BatchEndpoint, PipelineComponentBatchDeployment

# from azure.ai.ml.entities import ModelBatchDeployment, ModelBatchDeploymentSettings, Model, AmlCompute, Data, BatchRetrySettings, CodeConfiguration, Environment, Data
# from azure.ai.ml.constants import BatchDeploymentOutputAction


endpoint_name = "hello-my-pipeline-endpoint"
endpoint = BatchEndpoint(
    name=endpoint_name,
    description="A hello world endpoint for pipeline",
)

ml_client.batch_endpoints.begin_create_or_update(endpoint).result()
每个终结点可以支持多个部署,每个部署都与不同的管道相关联。在此上下文中,我们使用流管道作业启动新的部署,目标是最近建立的终结点。
deployment = PipelineComponentBatchDeployment(
    name="my-pipeline-deployment",
    description="A hello world deployment with a pipeline job.",
    endpoint_name=endpoint.name,
    # Make sure 'pipeline_job_run' run successfully before deploying the endpoint
    job_definition=pipeline_job_run,
    settings={"default_compute": "cpu-cluster", "continue_on_step_failure": False},
)

ml_client.batch_deployments.begin_create_or_update(deployment).result()

# Refresh the default deployment to the latest one at our endpoint.
endpoint = ml_client.batch_endpoints.get(endpoint.name)
endpoint.defaults.deployment_name = deployment.name
ml_client.batch_endpoints.begin_create_or_update(endpoint).result()
使用适当的数据调用目标终结点的默认部署
batch_endpoint_job = ml_client.batch_endpoints.invoke(
    endpoint_name=endpoint.name,
    inputs={"pipeline_input_data": data_input},
)
最后,使用以下链接在工作区 UI 上验证调用:
ml_client.jobs.get(batch_endpoint_job.name)
要探索有关 Azure Machine Learning 批处理终结点的更多详细信息,请访问此文章:如何使用批处理管道部署