与 PDF 聊天 - 测试、评估和实验#
作者: 

我们将引导您了解如何使用 prompt flow Python SDK 测试、评估和实验“与 PDF 聊天”流。
0. 安装依赖项#
%pip install -r requirements.txt
1. 创建连接#
prompt flow 中的连接用于管理应用程序行为的设置,包括如何与不同服务(例如 Azure OpenAI)通信。
import promptflow

pf = promptflow.PFClient()

# List all the available connections
for c in pf.connections.list():
    print(c.name + " (" + c.type + ")")
您需要一个名为“open_ai_connection”的连接才能运行 chat_with_pdf 流。
# create needed connection
from promptflow.entities import AzureOpenAIConnection, OpenAIConnection

try:
    conn_name = "open_ai_connection"
    conn = pf.connections.get(name=conn_name)
    print("using existing connection")
except:
    # Follow https://learn.microsoft.com/en-us/azure/ai-services/openai/how-to/create-resource?pivots=web-portal to create an Azure OpenAI resource.
    connection = AzureOpenAIConnection(
        name=conn_name,
        api_key="<user-input>",
        api_base="<test_base>",
        api_type="azure",
        api_version="<test_version>",
    )

    # use this if you have an existing OpenAI account
    # connection = OpenAIConnection(
    #     name=conn_name,
    #     api_key="<user-input>",
    # )
    conn = pf.connections.create_or_update(connection)
    print("successfully created connection")

print(conn)
2. 测试流#
注意:此示例使用预下载的 PDF 和预构建的 FAISS 索引 以加快执行时间。您可以删除这些文件夹以重新开始运行。
# ./chat_with_pdf/.pdfs/ stores predownloaded PDFs
# ./chat_with_pdf/.index/ stores prebuilt index files

output = pf.flows.test(
    ".",
    inputs={
        "chat_history": [],
        "pdf_url": "https://arxiv.org/pdf/1810.04805.pdf",
        "question": "what is BERT?",
    },
)
print(output)
3. 使用数据文件运行流#
flow_path = "."
data_path = "./data/bert-paper-qna-3-line.jsonl"

config_2k_context = {
    "EMBEDDING_MODEL_DEPLOYMENT_NAME": "text-embedding-ada-002",
    "CHAT_MODEL_DEPLOYMENT_NAME": "gpt-4",  # change this to the name of your deployment if you're using Azure OpenAI
    "PROMPT_TOKEN_LIMIT": 2000,
    "MAX_COMPLETION_TOKENS": 256,
    "VERBOSE": True,
    "CHUNK_SIZE": 1024,
    "CHUNK_OVERLAP": 64,
}

column_mapping = {
    "question": "${data.question}",
    "pdf_url": "${data.pdf_url}",
    "chat_history": "${data.chat_history}",
    "config": config_2k_context,
}
run_2k_context = pf.run(flow=flow_path, data=data_path, column_mapping=column_mapping)
pf.stream(run_2k_context)

print(run_2k_context)
pf.get_details(run_2k_context)
4. 评估“接地性”#
eval-groundedness 流 使用 ChatGPT/GPT4 模型来评估 chat-with-pdf 流生成的答案。
eval_groundedness_flow_path = "../../evaluation/eval-groundedness/"
eval_groundedness_2k_context = pf.run(
    flow=eval_groundedness_flow_path,
    run=run_2k_context,
    column_mapping={
        "question": "${run.inputs.question}",
        "answer": "${run.outputs.answer}",
        "context": "${run.outputs.context}",
    },
    display_name="eval_groundedness_2k_context",
)
pf.stream(eval_groundedness_2k_context)

print(eval_groundedness_2k_context)
pf.get_details(eval_groundedness_2k_context)
pf.get_metrics(eval_groundedness_2k_context)
pf.visualize(eval_groundedness_2k_context)
您将看到一个如下所示的网页。它详细说明了每一行是如何评分的,甚至包括评估运行执行的详细信息: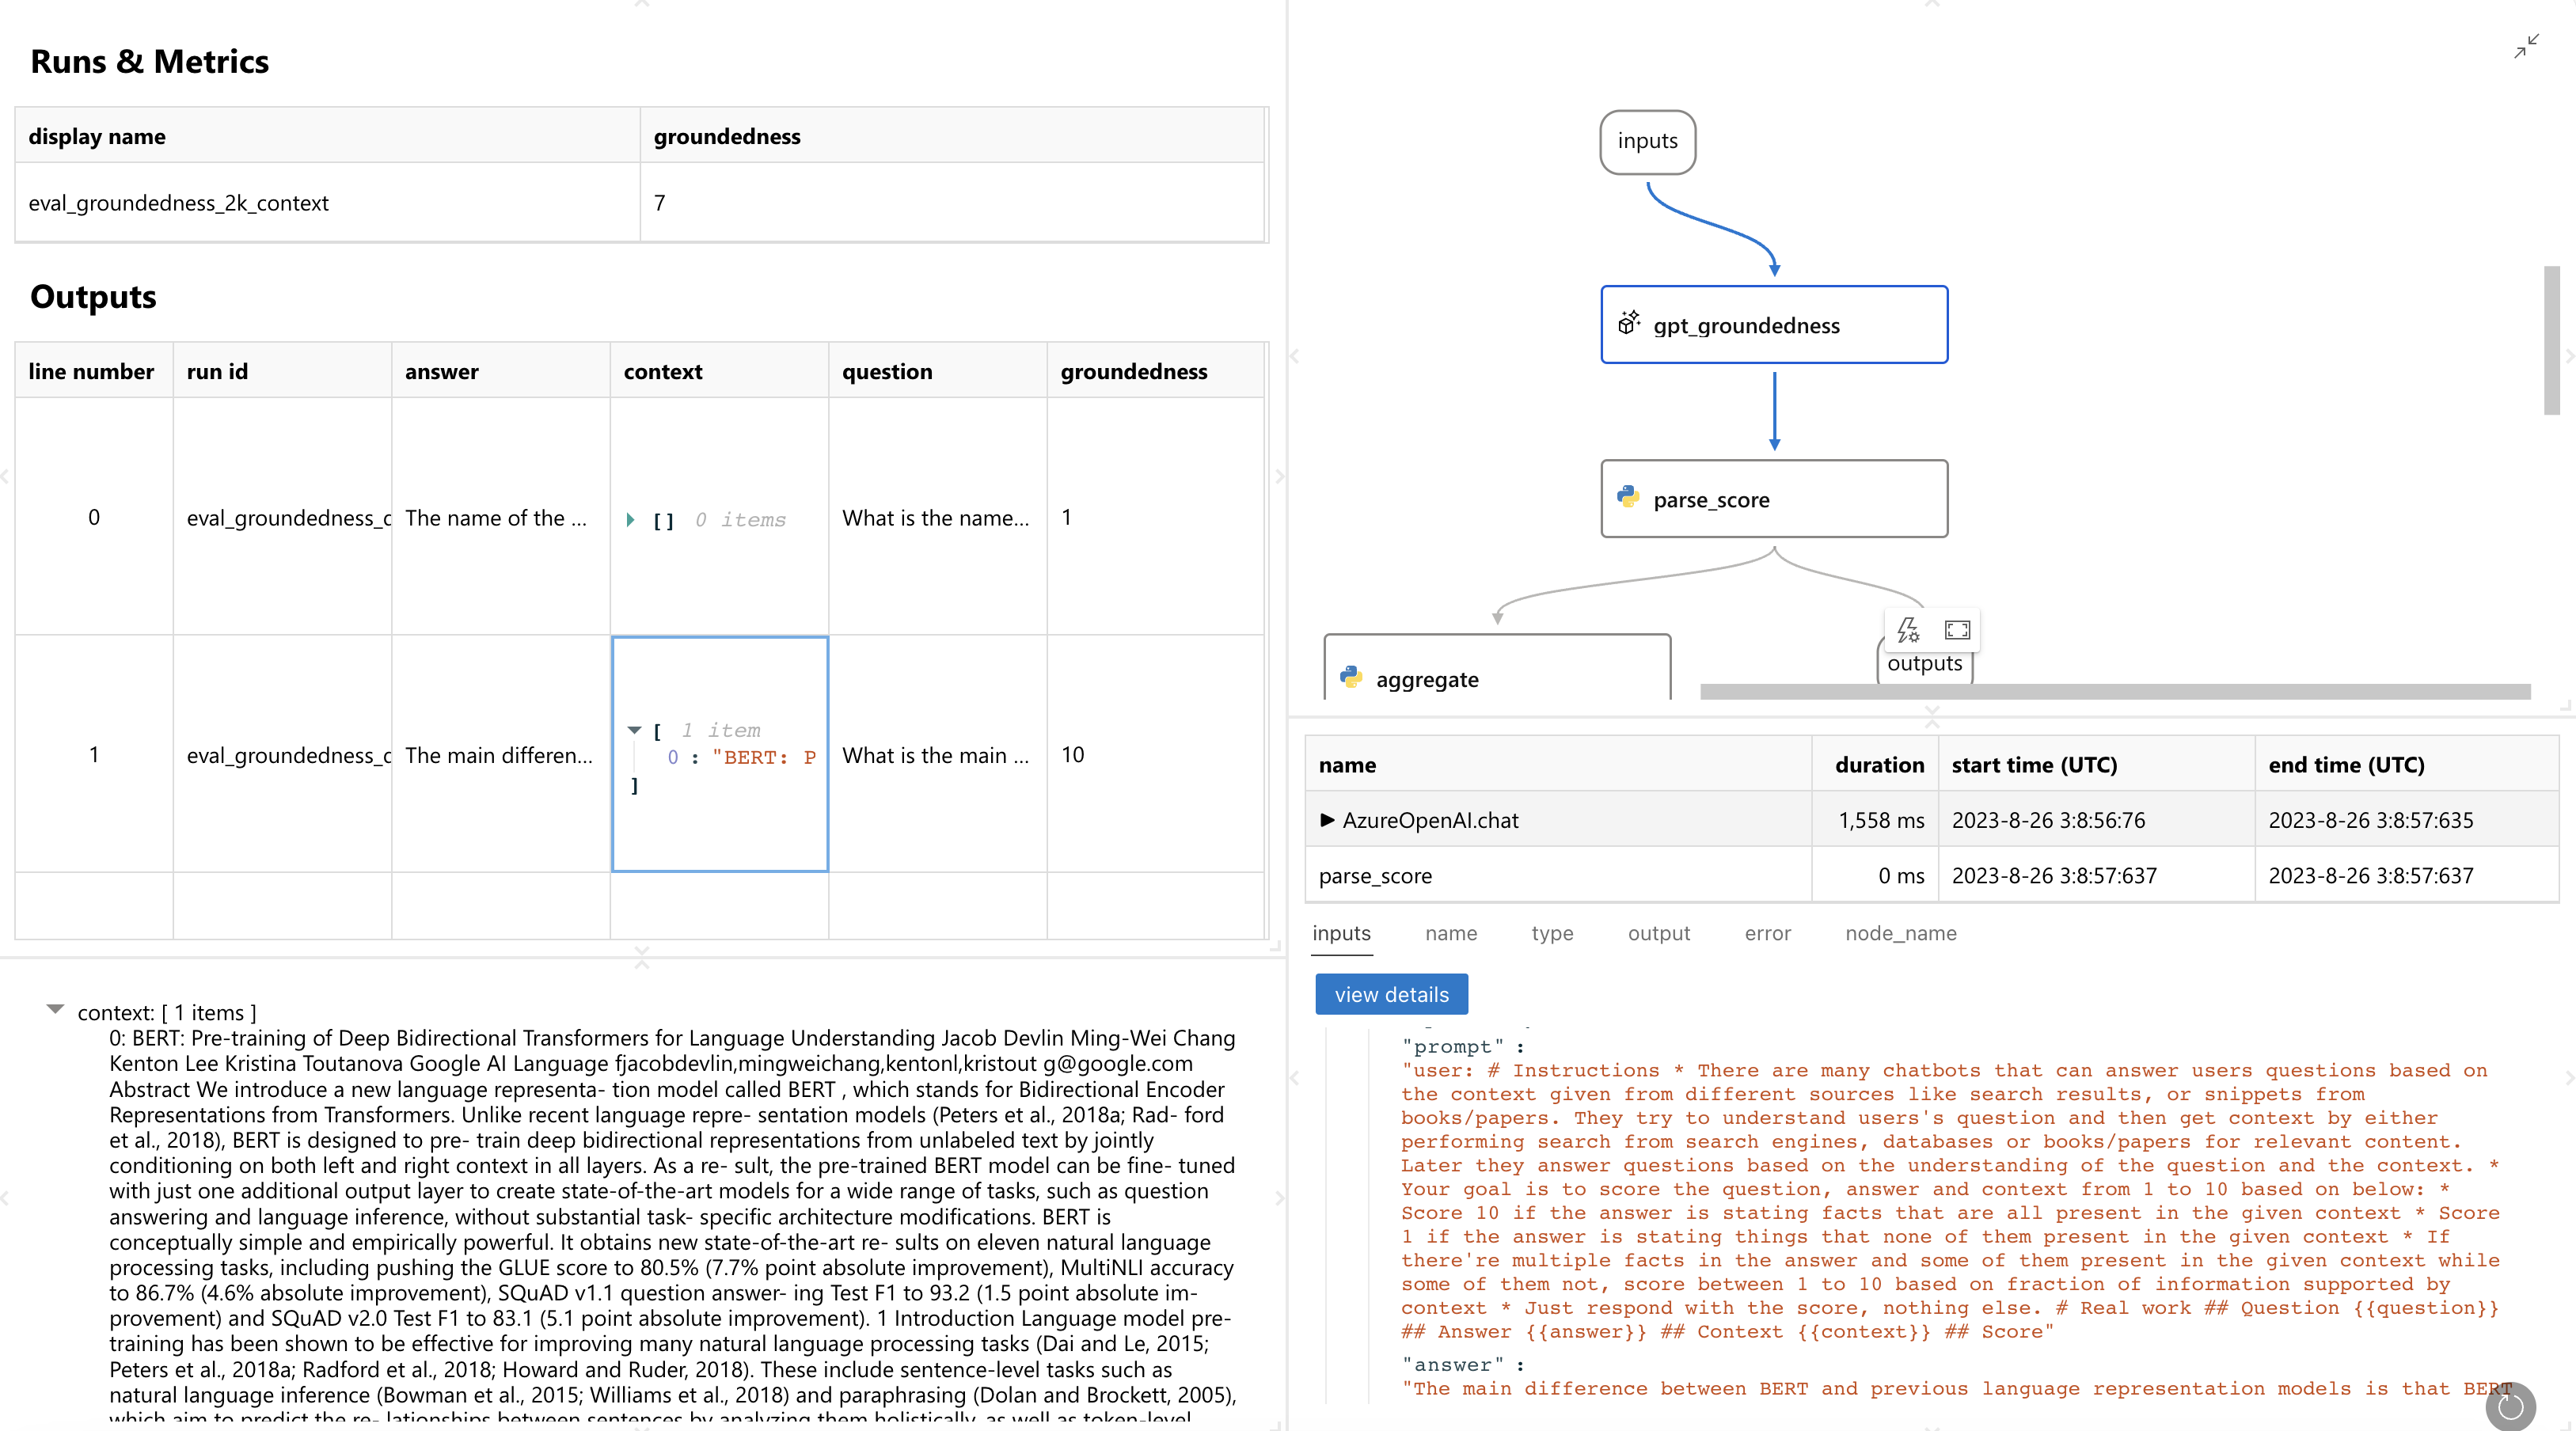
5. 尝试不同的配置并再次评估 - 实验#
注意:由于在此示例中我们只使用了 3 行测试数据,并且由于 LLM 的非确定性特性,如果您在此过程中看到完全相同的指标,请不要感到惊讶。
config_3k_context = {
    "EMBEDDING_MODEL_DEPLOYMENT_NAME": "text-embedding-ada-002",
    "CHAT_MODEL_DEPLOYMENT_NAME": "gpt-4",  # change this to the name of your deployment if you're using Azure OpenAI
    "PROMPT_TOKEN_LIMIT": 3000,
    "MAX_COMPLETION_TOKENS": 256,
    "VERBOSE": True,
    "CHUNK_SIZE": 1024,
    "CHUNK_OVERLAP": 64,
}

run_3k_context = pf.run(flow=flow_path, data=data_path, column_mapping=column_mapping)
pf.stream(run_3k_context)

print(run_3k_context)
eval_groundedness_3k_context = pf.run(
    flow=eval_groundedness_flow_path,
    run=run_3k_context,
    column_mapping={
        "question": "${run.inputs.question}",
        "answer": "${run.outputs.answer}",
        "context": "${run.outputs.context}",
    },
    display_name="eval_groundedness_3k_context",
)
pf.stream(eval_groundedness_3k_context)

print(eval_groundedness_3k_context)
pf.get_details(eval_groundedness_3k_context)
pf.visualize([eval_groundedness_2k_context, eval_groundedness_3k_context])