代码执行#
在本节中,我们将探讨如何创建自定义代理来处理代码生成和执行。这些任务可以使用此处提供的代理实现来处理:AssistantAgent()、CodeExecutorAgent();但本指南将向您展示如何实现可以替代其功能的自定义、轻量级代理。这个简单的示例实现了两个代理,它们创建了特斯拉和英伟达股票回报的图表。
我们首先定义代理类及其各自处理消息的程序。我们创建了两个代理类:Assistant 和 Executor。Assistant 代理编写代码,Executor 代理执行代码。我们还创建了一个 Message 数据类,它定义了代理之间传递的消息。
注意
此示例中生成的代码将在 Docker 容器中运行。请确保在运行示例之前已安装并运行 Docker。本地代码执行可用(LocalCommandLineCodeExecutor),但不推荐使用,因为在本地环境中运行 LLM 生成的代码存在风险。
import re
from dataclasses import dataclass
from typing import List

from autogen_core import DefaultTopicId, MessageContext, RoutedAgent, default_subscription, message_handler
from autogen_core.code_executor import CodeBlock, CodeExecutor
from autogen_core.models import (
    AssistantMessage,
    ChatCompletionClient,
    LLMMessage,
    SystemMessage,
    UserMessage,
)


@dataclass
class Message:
    content: str


@default_subscription
class Assistant(RoutedAgent):
    def __init__(self, model_client: ChatCompletionClient) -> None:
        super().__init__("An assistant agent.")
        self._model_client = model_client
        self._chat_history: List[LLMMessage] = [
            SystemMessage(
                content="""Write Python script in markdown block, and it will be executed.
Always save figures to file in the current directory. Do not use plt.show(). All code required to complete this task must be contained within a single response.""",
            )
        ]

    @message_handler
    async def handle_message(self, message: Message, ctx: MessageContext) -> None:
        self._chat_history.append(UserMessage(content=message.content, source="user"))
        result = await self._model_client.create(self._chat_history)
        print(f"\n{'-'*80}\nAssistant:\n{result.content}")
        self._chat_history.append(AssistantMessage(content=result.content, source="assistant"))  # type: ignore
        await self.publish_message(Message(content=result.content), DefaultTopicId())  # type: ignore


def extract_markdown_code_blocks(markdown_text: str) -> List[CodeBlock]:
    pattern = re.compile(r"```(?:\s*([\w\+\-]+))?\n([\s\S]*?)```")
    matches = pattern.findall(markdown_text)
    code_blocks: List[CodeBlock] = []
    for match in matches:
        language = match[0].strip() if match[0] else ""
        code_content = match[1]
        code_blocks.append(CodeBlock(code=code_content, language=language))
    return code_blocks


@default_subscription
class Executor(RoutedAgent):
    def __init__(self, code_executor: CodeExecutor) -> None:
        super().__init__("An executor agent.")
        self._code_executor = code_executor

    @message_handler
    async def handle_message(self, message: Message, ctx: MessageContext) -> None:
        code_blocks = extract_markdown_code_blocks(message.content)
        if code_blocks:
            result = await self._code_executor.execute_code_blocks(
                code_blocks, cancellation_token=ctx.cancellation_token
            )
            print(f"\n{'-'*80}\nExecutor:\n{result.output}")
            await self.publish_message(Message(content=result.output), DefaultTopicId())
您可能已经注意到,代理的逻辑,无论是使用模型还是代码执行器,都与消息的传递方式完全解耦。这是核心思想:框架提供了通信基础设施,代理负责自己的逻辑。我们将通信基础设施称为 代理运行时。
代理运行时是此框架的一个关键概念。除了传递消息,它还管理代理的生命周期。因此,代理的创建由运行时处理。
以下代码展示了如何使用 SingleThreadedAgentRuntime(一种本地嵌入式代理运行时实现)注册和运行代理。
import tempfile

from autogen_core import SingleThreadedAgentRuntime
from autogen_ext.code_executors.docker import DockerCommandLineCodeExecutor
from autogen_ext.models.openai import OpenAIChatCompletionClient

work_dir = tempfile.mkdtemp()

# Create an local embedded runtime.
runtime = SingleThreadedAgentRuntime()

async with DockerCommandLineCodeExecutor(work_dir=work_dir) as executor:  # type: ignore[syntax]
    # Register the assistant and executor agents by providing
    # their agent types, the factory functions for creating instance and subscriptions.
    model_client = OpenAIChatCompletionClient(
        model="gpt-4o",
        # api_key="YOUR_API_KEY"
    )
    await Assistant.register(
        runtime,
        "assistant",
        lambda: Assistant(model_client=model_client),
    )
    await Executor.register(runtime, "executor", lambda: Executor(executor))

    # Start the runtime and publish a message to the assistant.
    runtime.start()
    await runtime.publish_message(
        Message("Create a plot of NVIDA vs TSLA stock returns YTD from 2024-01-01."), DefaultTopicId()
    )

    # Wait for the runtime to stop when idle.
    await runtime.stop_when_idle()
    # Close the connection to the model client.
    await model_client.close()
--------------------------------------------------------------------------------
Assistant:
```python
import pandas as pd
import numpy as np
import matplotlib.pyplot as plt
import yfinance as yf

# Define the ticker symbols for NVIDIA and Tesla
tickers = ['NVDA', 'TSLA']

# Download the stock data from Yahoo Finance starting from 2024-01-01
start_date = '2024-01-01'
end_date = pd.to_datetime('today').strftime('%Y-%m-%d')

# Download the adjusted closing prices
stock_data = yf.download(tickers, start=start_date, end=end_date)['Adj Close']

# Calculate the daily returns
returns = stock_data.pct_change().dropna()

# Plot the cumulative returns for each stock
cumulative_returns = (1 + returns).cumprod()

plt.figure(figsize=(10, 6))
plt.plot(cumulative_returns.index, cumulative_returns['NVDA'], label='NVIDIA', color='green')
plt.plot(cumulative_returns.index, cumulative_returns['TSLA'], label='Tesla', color='red')
plt.title('NVIDIA vs Tesla Stock Returns YTD (2024)')
plt.xlabel('Date')
plt.ylabel('Cumulative Return')
plt.legend()
plt.grid(True)
plt.tight_layout()

# Save the plot to a file
plt.savefig('nvidia_vs_tesla_ytd_returns.png')
```

--------------------------------------------------------------------------------
Executor:
Traceback (most recent call last):
  File "/workspace/tmp_code_fd7395dcad4fbb74d40c981411db604e78e1a17783ca1fab3aaec34ff2c3fdf0.python", line 1, in <module>
    import pandas as pd
ModuleNotFoundError: No module named 'pandas'


--------------------------------------------------------------------------------
Assistant:
It seems like the necessary libraries are not available in your environment. However, since I can't install packages or check the environment directly from here, you'll need to make sure that the appropriate packages are installed in your working environment. Once the modules are available, the script provided will execute properly.

Here's how you can install the required packages using pip (make sure to run these commands in your terminal or command prompt):

```bash
pip install pandas matplotlib yfinance
```

Let me provide you the script again for reference:

```python
import pandas as pd
import numpy as np
import matplotlib.pyplot as plt
import yfinance as yf

# Define the ticker symbols for NVIDIA and Tesla
tickers = ['NVDA', 'TSLA']

# Download the stock data from Yahoo Finance starting from 2024-01-01
start_date = '2024-01-01'
end_date = pd.to_datetime('today').strftime('%Y-%m-%d')

# Download the adjusted closing prices
stock_data = yf.download(tickers, start=start_date, end=end_date)['Adj Close']

# Calculate the daily returns
returns = stock_data.pct_change().dropna()

# Plot the cumulative returns for each stock
cumulative_returns = (1 + returns).cumprod()

plt.figure(figsize=(10, 6))
plt.plot(cumulative_returns.index, cumulative_returns['NVDA'], label='NVIDIA', color='green')
plt.plot(cumulative_returns.index, cumulative_returns['TSLA'], label='Tesla', color='red')
plt.title('NVIDIA vs Tesla Stock Returns YTD (2024)')
plt.xlabel('Date')
plt.ylabel('Cumulative Return')
plt.legend()
plt.grid(True)
plt.tight_layout()

# Save the plot to a file
plt.savefig('nvidia_vs_tesla_ytd_returns.png')
```

Make sure to install the packages in the environment where you run this script. Feel free to ask if you have further questions or issues!

--------------------------------------------------------------------------------
Executor:
[*********************100%***********************]  2 of 2 completed


--------------------------------------------------------------------------------
Assistant:
It looks like the data fetching process completed successfully. You should now have a plot saved as `nvidia_vs_tesla_ytd_returns.png` in your current directory. If you have any additional questions or need further assistance, feel free to ask!
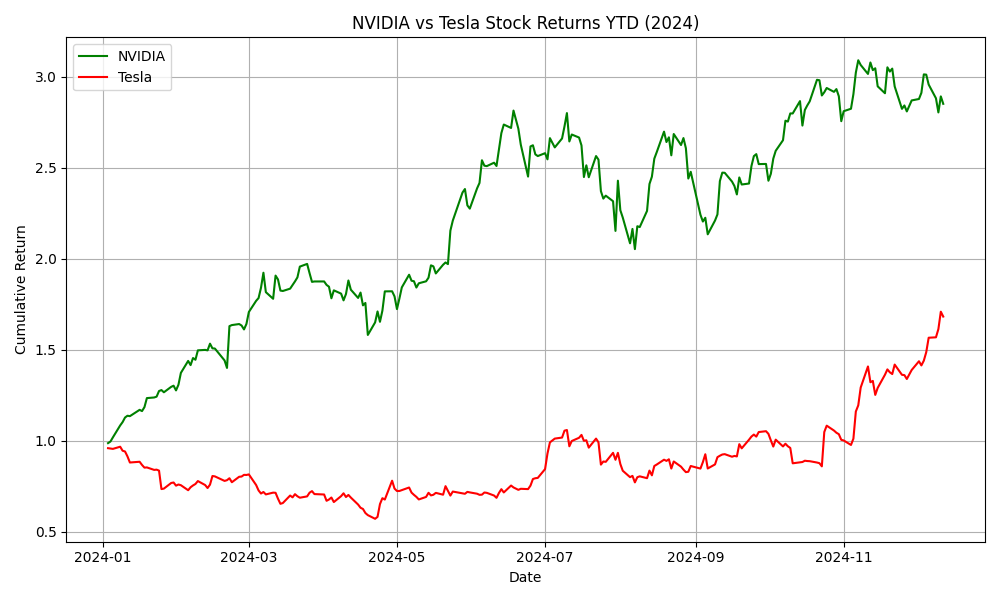
从代理的输出中,我们可以看到特斯拉和英伟达股票回报的图表已经创建。
from IPython.display import Image

Image(filename=f"{work_dir}/nvidia_vs_tesla_ytd_returns.png")  # type: ignore
AutoGen 还支持分布式代理运行时,该运行时可以托管在不同进程或机器上运行的代理,这些代理具有不同的身份、语言和依赖项。
要了解如何使用代理运行时、通信、消息处理和订阅,请继续阅读本快速入门后面的部分。